
Blocks Off, Brains Off
9 min read
I am a pilot. (Quick explanation: How do you spot the pilot at a party? He‘ll tell you 🙂
Every time I take to the air, I’m reminded that what goes up must also be logged. Meaning, I have to keep a logbook with all my flight times. Not that this would be very exhausting or complicated, but my threshold for affirming ‚Could I engineer this problem out of my life?‘ is quite low.
Goal
I had several goals with this development.
- Admittedly, the main motivator was laziness. First and foremost I wanted a device that would easily record time events and calculate durations without me having to do all this pesky mental arithmetic. (Yes, it‘s a special kind of laziness. I‘d rather go through the trouble of building and programming a device than do some easy math)
- In the back of my mind I had the hopes of being able to sell it and become gazillionaire.
- Simplicity. I wanted to have only the controls it absolutely needed and nothing more. Ideally I could hand the flight timer to someone who had never seen it before and within one minute explain all there is to it.
- In addition to manual input, the timer shall record both flight and block times autonomously. Corrections can still be done manually.
- The device should be small enough to not obstruct anything in the cockpit. It should also be lightweight so it can be clipped to a shoulder strap for example and this way be accessible for quick inputs.
Materials & Tools
- Arduino
- An OLED screen
- A quadrature encoder
- LiPo battery cell
- BMS (battery management system) and charging circuit
- RTC module (real time clock)
- Project box
- Standard electronics components like resistors, wires, perf board, buttons
Process
Background
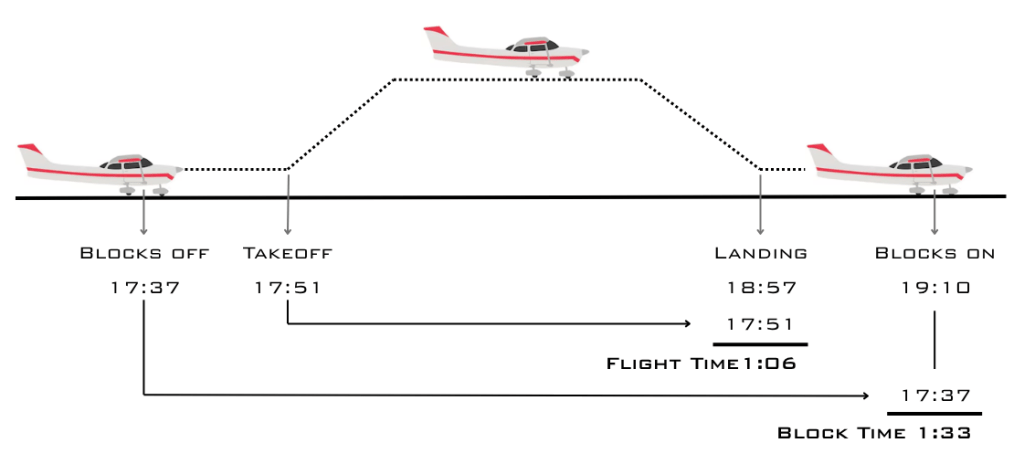
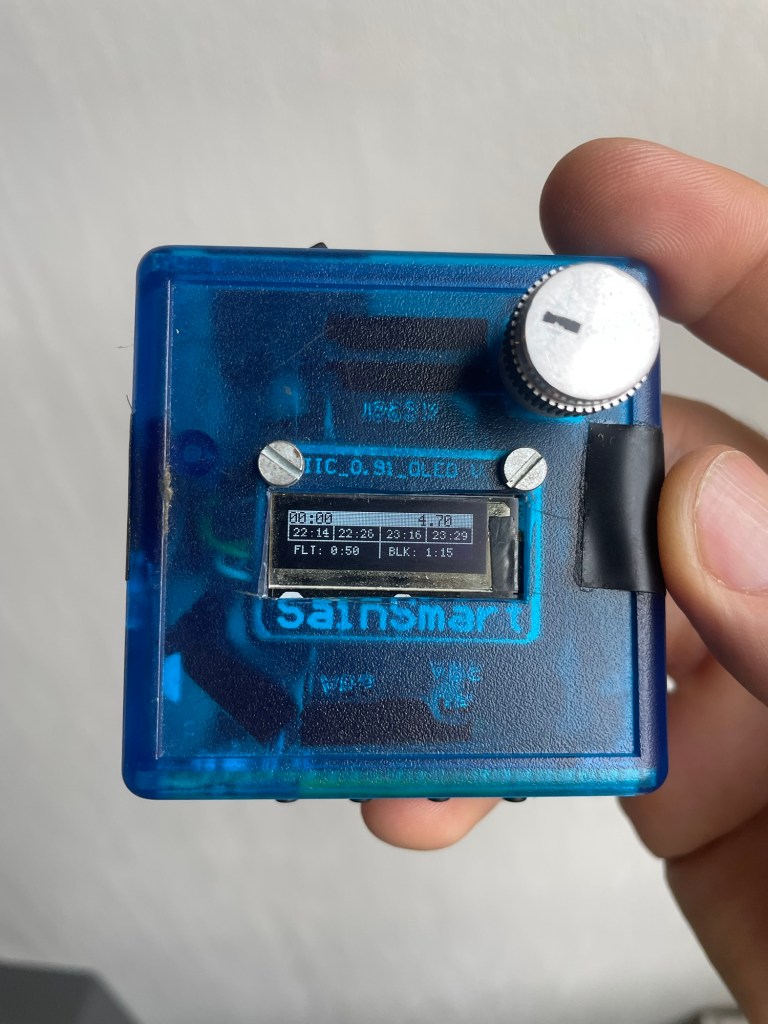
The records that must end up in the logbook after every flight are flight time, block time and their start and end times.
Flight time (or sometimes called air time) is the difference in time from when the wheels leave the ground to when they touch down again.
Block time starts when „Blocks are off“ to when „Blocks are on“. What? The timer starts when something is off?? How weird. I think it is counterintuitive as well, but it makes sense once you understand what those blocks do. To secure an airplane from rolling around the parking area on its own, wheel chocks or blocks are placed around the wheels. When the pilot is ready to get going he signals to the ground crew to remove the blocks. They are taken away, marking the „blocks off“-time. At least that‘s where term comes from. Smaller aircraft like the ones I fly hardly ever use wheel chocks or ground crews and the block time has become equivalent to engine run time.
So a flight generates four timestamps. In sequence, they are blocks off, takeoff, landing and blocks on. The difference between blocks off / on is the block time, the difference between takeoff and landing is the flight time. The pilot enters the block time into his pilot‘s logbook as flight experience and flight time is entered into the aircraft logbook.
Vision
I did not want to design a fancy or complicated device. Not because I couldn‘t, but because I wanted the device to solve just one small and very specific problem and do it in a manner that is as simple as possible. Sometimes it’s even harder to make something simple than to make it complicated.
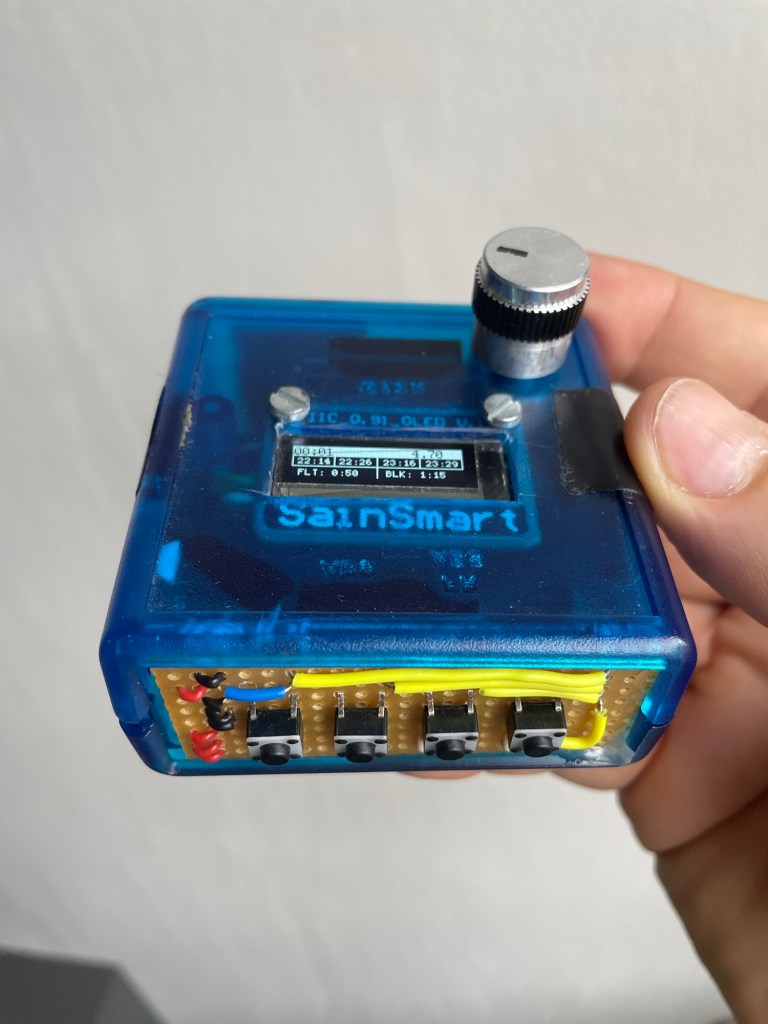
The flight timer would have four buttons for one simple function each: mark their respective times. Then there must be a way to adjust those times and finally a means to extract the results of the calculation.
I connected this need for simplicity to the nature of the problem. Calculating time differences is already not complicated to begin with, so whatever I designed should not be more complicated. Otherwise it would end up not being used.
Leaving adjustments aside, the device should work in one-hand operation. If needed even by touch alone.
The concept of operation is thus:
- When the engine is started, the first button is pressed. This logs the blocks off time.
- Right before takeoff (which is safer than during the busy phase of takeoff itself) the second button is pressed, logging time of takeoff.
- Just after landing the third button is pressed, logging landing time.
- With engine shutdown the fourth button is pressed, logging blocks on time.

The flight timer immediately calculates flight and block time and displays all information. The pilot can transfer all timestamps and calculated times from the display into the logbooks.
Autonomous Functionality
Quite often it happened to me that I would go flying and miss one or more time stamps. I would sit down at the end of the flight to complete the admin stuff and notice I had forgotten to note down when I shut off the engine for example. Sure, a quick button press is easier than reaching for the pen and scribbling something illegible on the kneeboard. But if simply forget, the method of recording becomes irrelevant. What if the burden of remembering is taken on by the device as well?
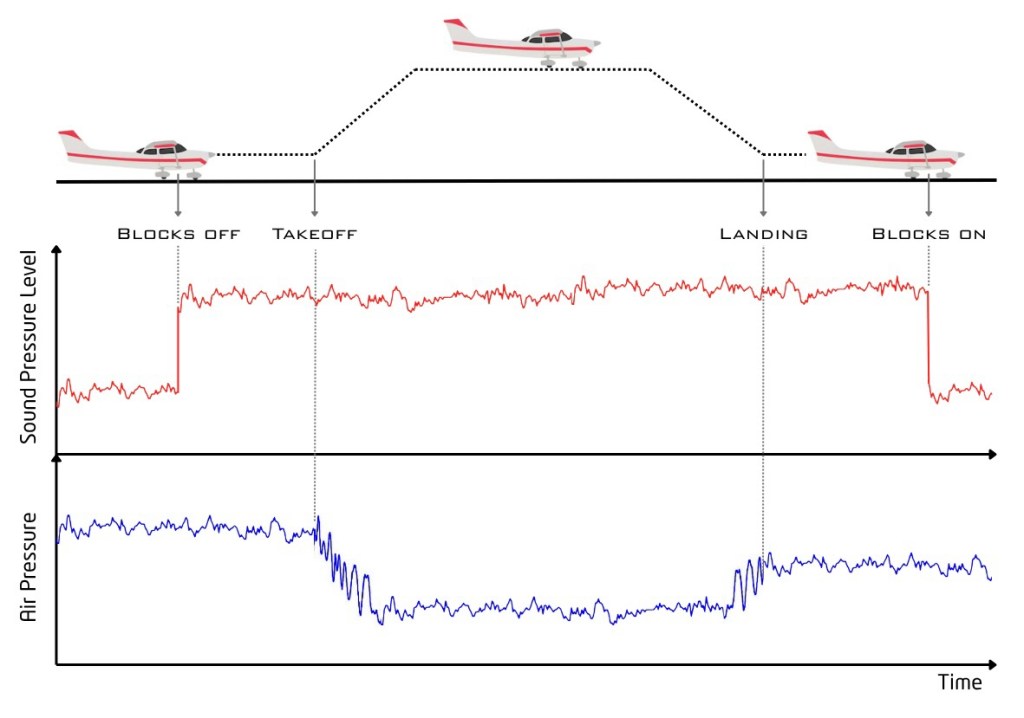
In the small airplanes I fly, the block times are defined by the engine‘s on and off times. The engine makes a lot of noise and for sure this would not be too hard to pick up with a microphone. The microcontroller would basically record and display the „loud-noise-time“ as block time.
The takeoff and landing times I intended to grab with a barometric air-pressure sensor and software logic. The drop in air pressure after takeoff would certainly be easy to pick out from the readings and the last change in air pressure before the engine is turned off should be equally simple to spot in the data as landing time.
Circuit Design
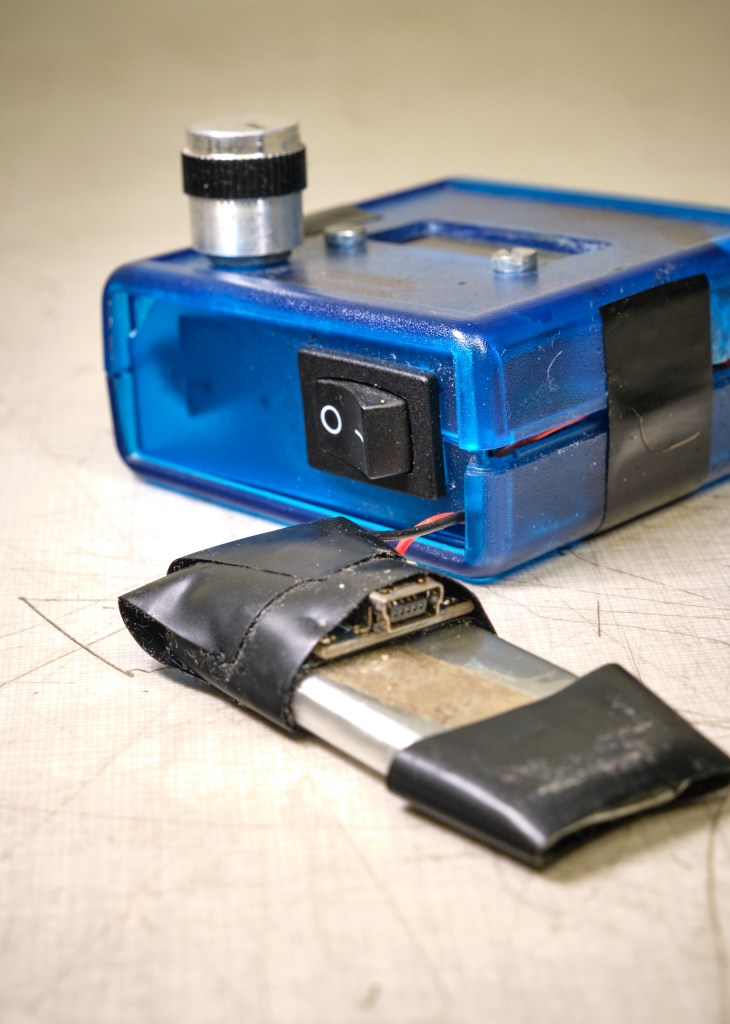
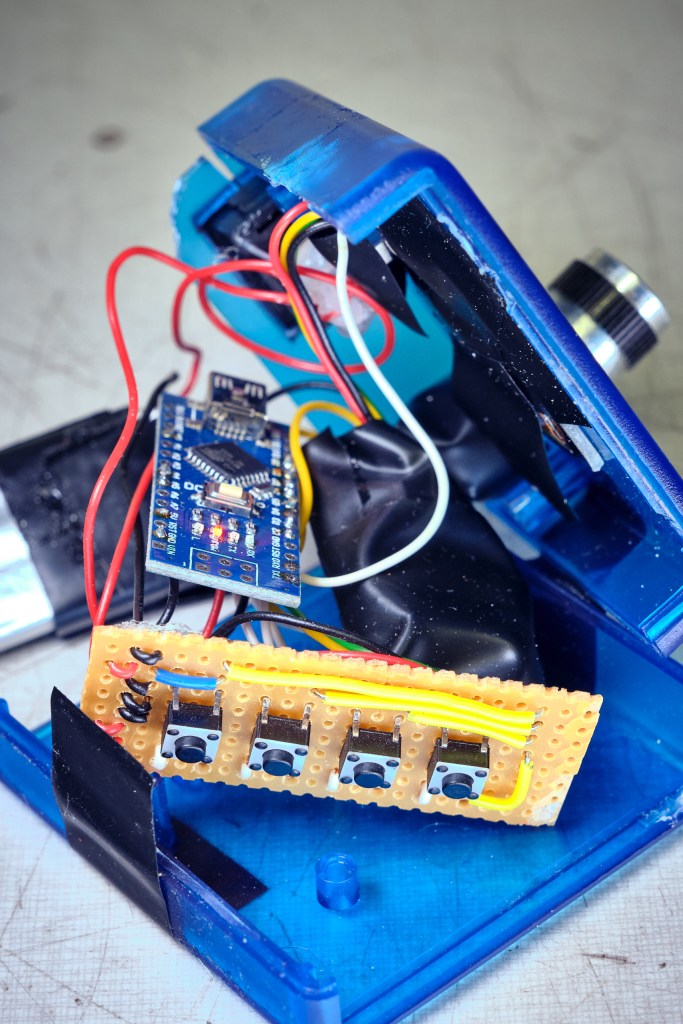
The word ‚design’ suggests a structured approach. As you will see later in the results, there was nothing of the kind. The Arduino, the RTC, the switch, the encoder and other things are connected by individual wires and all is jammed into a case. Some electricians tape tries to keep the number of short-circuits at bay and the adjustment knob demonstrates the opposite of integrated design.
At least the small front panel with the four buttons shows some remnant of engineering pride. Not a comparison by a long shot, but there is some remote semblance to the amazing work by albin.jd.
Code Logic
In manual mode, the press of a button would copy the current time from the RTC, store and show it on the display. Flight time is calculated as soon as both takeoff and landing times are logged, the same principle goes for the block time.
Adjustments can be made by pressing a button and rotating the knob. If no other times are recorded, the adjustment is not constrained. If other entries are available, the adjustment is constrained between the existing entries.
Challenges & Learnings
I hit a wall of frustration very quickly. The result of this is visible in the absolute pre-prototype look of the device. It does work like intended (minus the autonomous functionality), so that goal was achieved. But it was so hideous and bulky that I did not end up using it a lot. The bulkiness prevented its use in the cockpit, and without a clip I could not really attach it anywhere.
Frustration also arose from the plethora of available parts. Paralysis by analysis is the term, I believe. It‘s like when you‘re in the supermarket, standing in the fruit jam aisle and there are a billion of varieties just for strawberry, let alone all the other fruits. The choice is much easier to make when the selection is much smaller, say three varieties. It was the same for me. There are a number of components needed for the device, and for every component there is a multitude of choices. Additionally, every choice has direct influence and dependencies on the electronics design, the shape of the case, the wiring — everything.
A challenge was the unexpected complexity of audio processing. I am a mechanical engineer by training with only hobbyist knowledge of electronics. I simply assumed that measuring a time-averaged microphone voltage output would be sufficient. Turns out there is a lot more to audio signal processing. I think today, some years later, I am in a much better position to take on that challenge if I decide to dive into that project again.
Without the automatic block time record, I also left out the air pressure recording.
Result


Reflections
Laziness and engineering. Coming back to the first goal statement, I once heard the phrase „A good engineer is a lazy one“. Why? Who wants to hire lazy people?? I think about it this way. All engineering is, is the pursuit of efficiency. The big eta, greek symbol η. Could you walk from A to B? Sure, but it‘s more efficient to take a bicycle. Could you transport a ton of bricks from one place to the other on foot, carrying one brick at a time? Not a problem per se, but it‘s way more efficient to do it with a truck. Everything in the engineered world can be thought of that way, in terms of efficiency.
The flight timer I am showing you was made a number of years ago. The reason I am documenting it now is because I feel the Flight Timer v2 project looking at me around a not too distant corner. Inspired by the success of the TV-B-Gone and my belief of increased ability to „embrace the suck“, I think I could tackle the frustrations that held back greatness during the initial version much better.
Also, even though the device itself was not a great success, I learnt some things from the process of making it. And that has its own value. Not every post must be a shiny, successful result of workshop time.
On the other hand, similarly to the TV-B-Gone where fewer and fewer TVs are a valid target nowadays, I feel with the shift in the cockpit from paper based flying to tablet assisted flying, the flight timer also has limited use. I made the switch from paper to tablet only recently and reluctantly, but now that I have, I would not go back anymore. The problem for the flight timer is that the tablet already incorporates all its functions and more. So if I were to launch into this project once more, I think it would be more for the joy of tinkering itself, the satisfaction of reaching the initial goal, than for commercial success or for the perfect solution to a problem.
Have you tried something similar? Got tips or questions? Feel free to leave a comment below.

Leave a comment